Entering the Garden of Ferris
A Better Rust Development Experience Using Cache Mounts and Garden


For all of Rust's good traits, it has its faults too.
I'm currently working on a larger Rust project with another developer. Since we're collaborating, I wanted to ensure that we were able to build, test, and deploy code easily, quickly, and maintainably.
Anyone that has worked on a larger Rust project will understand some of the challenges that come with building and deploying your services.
This article will reveal my thought processes, and eventual solution, for making the most enjoyable dev environment of my life.
Slow Builds
One common complaint is that Rust's build times are slow. In contrast to languages like Typescript or Go, builds can feel like they take an eternity.
Thankfully, Rust has incremental compilation, which helps cache much of the build process, making your subsequent builds significantly faster. Just take a look at the difference in these two build times!
Initial build for a small project

Second build after a small change in the project (incrementally cached)

Incremental builds are great! So Rust's local development woes are solved, right?
Containers
I wish.
Unfortunately, containers throw a bit of a wrench in that.
Developers often find that it's useful to be able to run a scaled down copy of production, locally (or in a dev environment) for quick iteration, integration tests, and manual testing. Similar environments need to be spun up within CI and eventually your production environment.
To keep these environments similar, and to simplify deployment from CI/CD, the industry has moved towards containerization. Containers have helped eliminate the "it works on my machine" woes of the past, and have given us the capability of packaging our apps, dependencies and all.

Here's an example Dockerfile that might build our code:
FROM rust
WORKDIR /src
COPY . .
RUN cargo build --release
ENTRYPOINT ["/src/target/release/app"]
This file says the following:
Starting with the
rustbase-image on Dockerhub, set the working directory to/src.Then, copy everything from the current directory (the first
.inCOPY) on our machine to this image in the current directory (the second.inCOPY).Then, run a release build.
Finally, when the image is ran, launch the binary found at
/src/target/release/app
The problem, of course, is that when we run a build we have to wait a while for all of our dependencies to build first. But, unlike our previous example with incremental compilation, if we make a small change to our project, Docker will have to start over from scratch! This is because this Docker image layer is invalidated if the result of the COPY command changes the layer in a way that hasn't been seen before.
So by moving to containers, we're not able to use incremental builds. This drastically increases our build times, even for small changes.
Workarounds
Now of course this is insane. So many folks have come up with a variety of solutions that make this better in some way or another.
One idea is to mount the target directory into your container. Assuming the volume is mounted as read-write, then your build process can incrementally cache your build in the target folder of your project.
The catch? This "works" for local development, but fails for any clean CI environment where the containers are needed. Furthermore, you risk potentially tainting the build between any builds issued on the host machine and the container, as they'll share a target folder.
So what can we do?
One solution, inspired by my friend Ian Nickles, is to use a new feature of Docker Buildkit: cache mounts.
Cache mounts allow us to mount a persistent volume during the image build process. We can mount this volume to a RUN command in our Dockerfile allowing for us to easily cache builds. One thing to note is that we'll also need to cache the cargo registry otherwise we'll end up downloading our dependencies each build. Ian also recommended caching ${RUST_HOME} so that rustup would cache any toolchain downloads as needed.
# syntax=docker/dockerfile:1
FROM rust AS builder
WORKDIR /src/
COPY . .
# Create cache mount for both the `target` folder
# And a cache mount for the cargo registry
RUN \
    --mount=type=cache,target=/src/target,rw \
    --mount=type=cache,target=/usr/local/cargo/registry,rw \
    --mount=type=cache,target=${RUST_HOME},rw \
    cargo build --release

ENTRYPOINT ["/src/target/release/app"]
From Packages to Workspaces
When you create a brand new Rust project using cargo new, you're not specifically creating a new crate, but a new package that happens to contain a crate. It's an important distinction! Reason being that a package can contain multiple crates. This means that I can take a package, run cargo build, and produce multiple binary artifacts and, if I so choose, a lib as well.
Well, what if you had multiple packages or needed multiple libraries? That's where Cargo Workspaces come into play. A Workspace is a collection of packages. They're a meta package of sorts which allow you to unify package version, features, and style across multiple projects. It's not all that uncommon to find a Workspace in use for a larger codebase.
Workspaces, as nice as they are for organizing your code, complicate our build process with these Dockerfiles a bit. No longer are we building a Package and setting a specific binary artifact as our ENTRYPOINT, but we likely have many distinct services across many projects. We want to benefit from incremental builds, but require multiple Dockerfiles to create images for each of our services.
One solution to this is to create a base image that builds our entire Workspace, and then create images that pull their respective artifacts from the original builder image. This pattern is known as a multi-stage build.
# Example, monolithic Dockerfile for Workspaces
# syntax=docker/dockerfile:1
FROM rust AS builder
WORKDIR /src/
COPY . .
# Create cache mount for both the `target` folder
# And a cache mount for the cargo registry
RUN \
    --mount=type=cache,target=/src/target,rw \
    --mount=type=cache,target=/usr/local/cargo/registry,rw \
    --mount=type=cache,target=${RUST_HOME},rw \
    cargo build --release

# Image for Service One
FROM rust:slim as service-one
COPY --from=builder /src/target/release/service_one /app/service_one
ENTRYPOINT ["/app/service_one"]

# Image for Service Two
FROM rust:slim as service-two
COPY --from=builder /src/target/release/service_two /app/service_two
ENTRYPOINT ["/app/service_two"]

# Image for Service Three
...
As we can see, this strategy can get unwieldy, quickly. What's even more concerning is that this doesn't even work.
Our cache mount volumes, which have saved us so much time, are only present during the execution of a RUN command with those mounts listed. If we want to access our artifacts, stored in target, we'll need to extract them first using another RUN.
Here was my solution for that. (showing just the builder stage)
# syntax=docker/dockerfile:1
FROM rust AS builder
WORKDIR /src/
COPY . .
RUN mkdir /artifacts/
# Create cache mount for both the `target` folder
# And a cache mount for the cargo registry
RUN \
    --mount=type=cache,target=/src/target,rw \
    --mount=type=cache,target=/usr/local/cargo/registry,rw \
    --mount=type=cache,target=${RUST_HOME},rw \
    cargo build --release

# Copy all of the executables in the root of the target directory
RUN \
    --mount=type=cache,target=/src/target,rw \
    find /src/target/release/ \
        -maxdepth 1 \
        -type f -executable \
        -exec cp {} /artifacts/ \;
With this change, our service can now pull their respective binaries from /artifacts/<binary>.
# Image for Service One
FROM rust:slim as service-one
COPY --from=builder /artifacts/service_one /app/service_one
ENTRYPOINT ["/app/service_one"]
So now our Dockerfile works, but a problem we find ourselves in is that Docker only builds the final image in your Dockerfile. This means that we'll need another way to build all of the image layers in our now monstrous, monolithic Dockerfile.
Docker-Compose
One route you could explore is using docker-compose to build each of the intermediate image layers in the Dockerfile. We could then publish each image, distinctly to a local docker registry if need be (though this would require a separate command ran, presumably, by the script initializing the build).
services:
  service_one:
    build:
      context: .
      target: service-one

  service_two:
    build:
      context: .
      target: service-two

   # ...
While this allows us to build all of our images using docker-compose build, we still have a couple of problems remaining:
Our Dockerfile grows every time we add a service
We need to keep a separate
docker-compose.ymlfile in sync for each added / modified serviceWe may need to tag & push each image to a local registry if we want to use local tools like
minikubeproviding yet another place that needs to be kept in sync with the services we're building
And we haven't even addressed the topic of deployment.
Garden(.io) of Eden
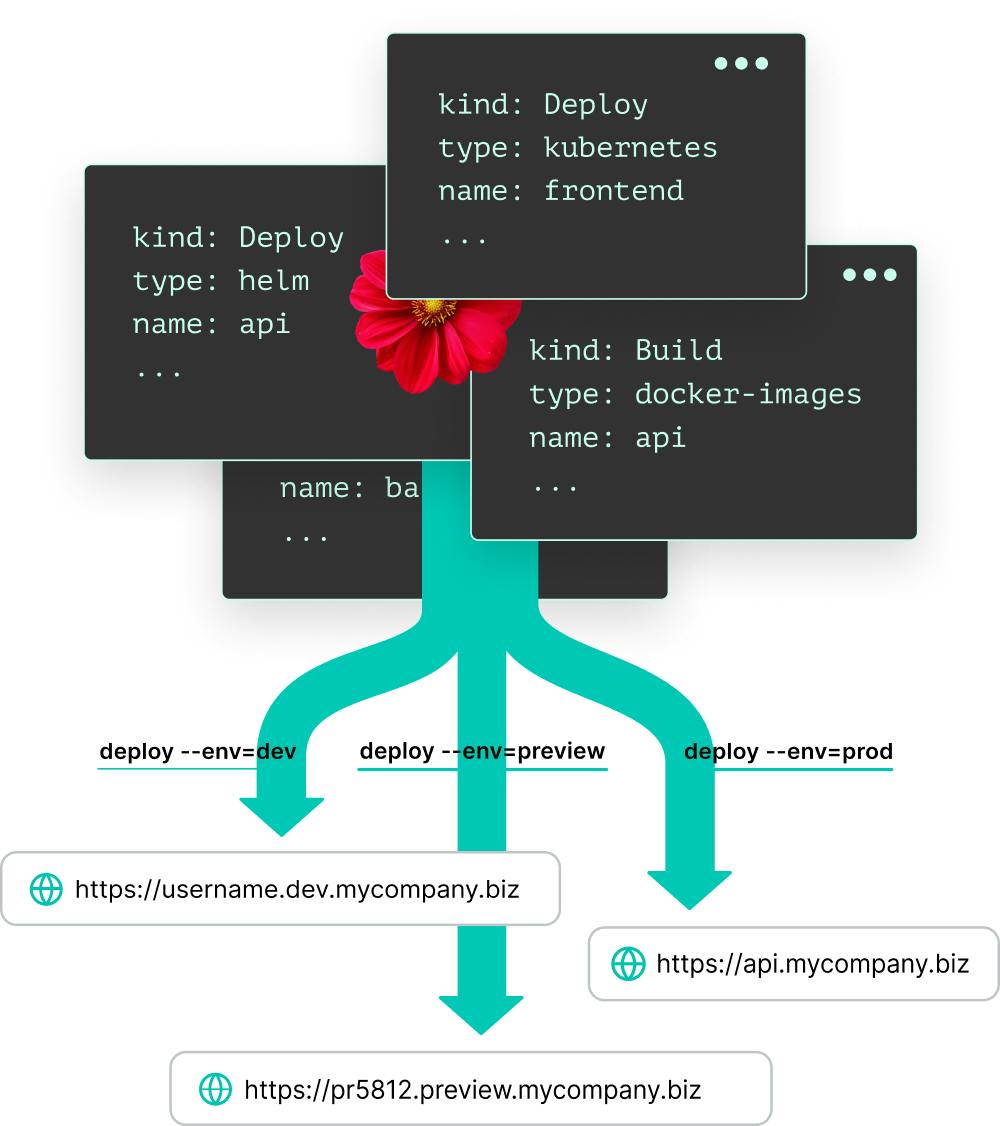
At some point I discovered Garden while trying to figure out a better way to deploy code to my dev-cluster. In their own words, Garden is "one blueprint for your entire system". It allows you to describe your services, how they're built, how they're deployed, integration tests, and commands that your engineers may need to run in production, and more.
My experience with Garden has been fantastic. It delivers on its promise of being a single blueprint for your services, handling build and deployment dependencies alike. It makes managing deployments to your various environments (prod, dev, qa, etc) simple.
Okay, enough gushing. How does Garden improve our situation here?
Currently, we have a monolithic Dockerfile and docker-compose.yml file to build our various image layers. With Garden, we can split up our Dockerfile so that each service's Dockerfile sits alongside its code.
How do we split a Dockerfile given that Dockerfiles don't really have a mechanism for importing? Garden handles that nicely for us.
First off, we'll define a garden.yml file for our Workspace-level Dockerfile.
kind: Module
name: build-artifacts
type: container
description: Builds our code
image: build-artifacts
Now Garden is aware of our monolithic Dockerfile.
Let's update our Workspace-level Dockerfile to remove the service image layers. We build our code in much the same way as before. We've also introduced a new image layer to ensure the Docker image is as small as possible.
# syntax=docker/dockerfile:1
FROM rust AS builder
WORKDIR /src/
COPY . .
RUN mkdir /artifacts/
# Create cache mount for both the `target` folder
# And a cache mount for the cargo registry
RUN \
    --mount=type=cache,target=/src/target,rw \
    --mount=type=cache,target=/usr/local/cargo/registry,rw \
    --mount=type=cache,target=${RUST_HOME},rw \
    cargo build --release

# Copy all of the executables in the root of the target directory
RUN \
    --mount=type=cache,target=/src/target,rw \
    find /src/target/release/ \
        -maxdepth 1 \
        -type f -executable \
        -exec cp {} /artifacts/ \;

# This is a lighter image that only contains the artifacts
FROM alpine AS build-artifacts
COPY --from=builder /artifacts/ /artifacts/
Next, we'll go to our services' Packages and move the image layers to new Dockerfiles. But first, we'll need a new garden.yml for each service so Garden is aware of them.
kind: Module
name: service-one
type: container
build:
  dependencies: [build-artifacts]
image: service-one
buildArgs:
  BUILD_VERSION: ${modules.build.version}
You'll note some differences in this garden.yml as compared to the previous one. First off is this section:
build:
  dependencies: [build-artifacts]
Here we're telling Garden that this Module's build process depends on the Module named build-artifacts. Now, Garden is able to construct a Directed Acyclic Graph (DAG) and build your Modules in order.
Next up is this:
buildArgs:
  BUILD_VERSION: ${modules.build.version}
This argument will be passed into our Dockerfile while building. It's a necessary piece needed to pull our build artifacts from the Docker image we've just built.
ARG BUILD_VERSION

# Create an image layer to hold the artifacts
FROM build-artifacts:${BUILD_VERSION} AS artifacts

# Service One
FROM rust:slim AS service-one
COPY --from=artifacts \
    /artifacts/service_one \
    /app/service_one
ENTRYPOINT ["/app/service_one"]
Now, by calling garden build, Garden will build our build-artifacts Docker image. Then, after that is complete, Garden will begin to build our service Docker images in parallel. This, thankfully, is a very quick step as our service Docker images merely copy already built artifacts.
One minor detail is that we need to ensure that our garden.yml don't overlap their context. To avoid these Modules from including each other, we can use exclude and include directives.
build-artifacts garden.yml:
kind: Module
name: build-artifacts
# ...
exclude: ["*/**/Dockerfile"]
Example service garden.yml:
kind: Module
name: service-one
# ...
include: ["Dockerfile"]
Putting it all Together
Now that all of our services are known to Garden, our Dockerfiles more manageable, and our build process efficient, we're finally able to talk about deployment.
Garden does more than just building, it allows us to easily replicate our production environment in dev clusters and in local dev environments. The key component to make this happen is your project.garden.yml. It defines the environments known to your Garden project.
environments:
  - name: local
  - name: dev
  - name: prod
And the providers that define the ways Garden intends to satisfy each environment.
providers:
  - name: local-kubernetes
    environments: [local]
    context: minikube

  - name: kubernetes
    environments: [dev]
    setupIngressController: nginx
    deploymentRegistry:
      hostname: registry.digitalocean.com
      namespace: dev-cluster
    context: do-sfo3-k8s-dev-cluster

  - name: kubernetes
    environments: [prod]
    setupIngressController: nginx
    deploymentRegistry:
      hostname: registry.digitalocean.com
      namespace: prod
    context: do-sfo3-k8s-prod
With this, we can easily change the environment we deploy to, respecting both build dependencies as well as service dependencies.
Finishing Touches
The last piece of my dev-cluster that makes the experience delightful is the use of ExternalDNS. This project monitors your k8s cluster and updates your DNS records when it detects a new service or ingress point, per your configuration.
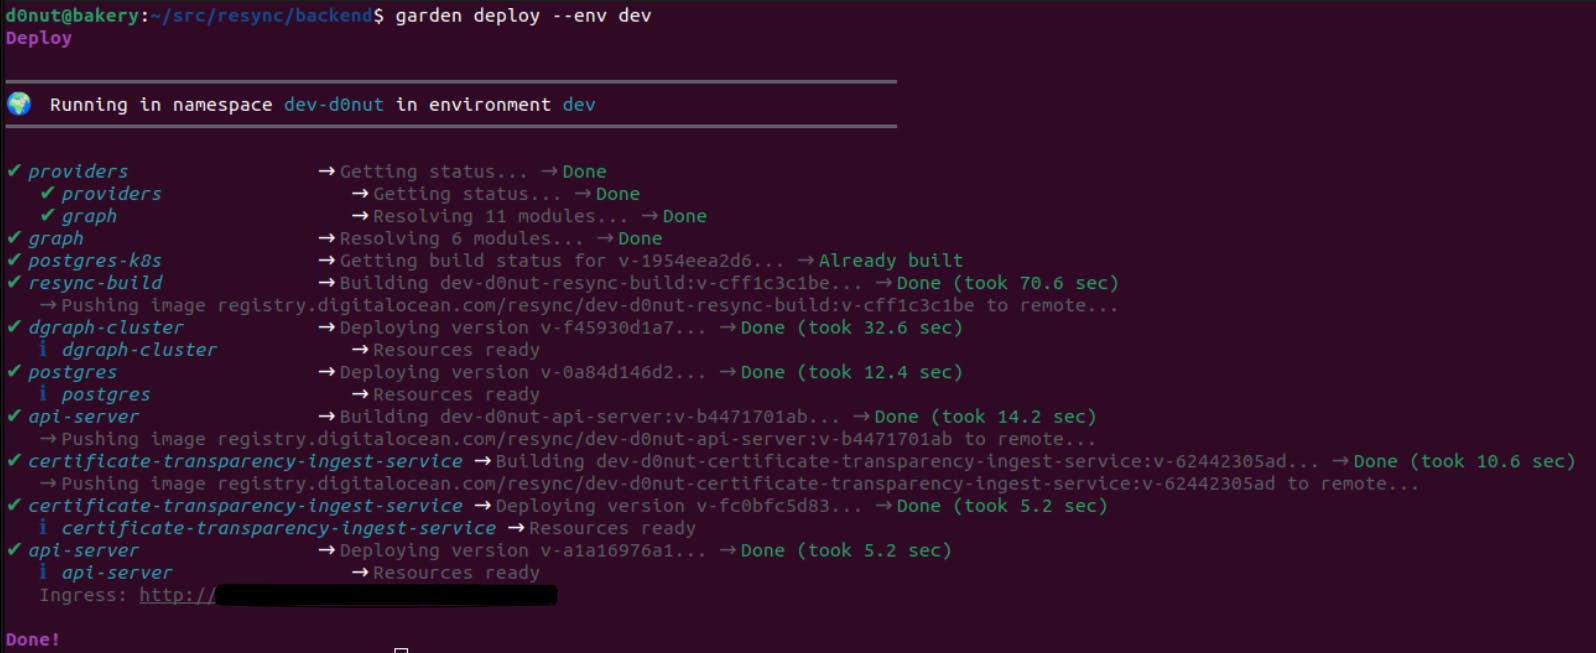
Now my deployment process is as simple as garden deploy --env dev, and in less than 30 seconds a new subdomain will be available that lets me hit my various services.
I've used many similar systems used for integration testing and such at past employers, but Garden has done an amazing job building a pleasant experience that just works. Give Garden, and this setup, a try and let me know what you think!